This is the third installment in my series of tutorials on building mashups using tools such as dapper for data mapping, and yahoo! pipes for data processing.

Monday, December 29, 2008
Sunday, December 14, 2008
Playing with Mashups - Part II : Integrating Dapper with Popfly
Update: The Popfly site was discontinued in August 2009, and this article is only been keep for archival purposes.
This blog post follows from a previous one where I experimented and mulled over the functions provided by the content mapping and mashup functionality provided by Dapper. In my first trial run, I created a mashup for an online discussion forum in which I participate on a regular basis. The mashup was pretty simple – yet, it was the result of composing several dapps together in an iterative manner using a variety of information output formats. In this post, I am summarizing how I was able to take the final dapp that was created in part 1, and use it as an input to Microsoft’s Popfly mashup creator.
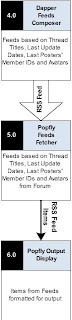
The data flow schematic and the popfly screenshot below reveal the configuration between the dapp and the popfly mashup. What’s happening here is that the dapp is used to output an RSS feed which is then captured by the RSS block in popfly. The specific items from the RSS feed are then rendered as a table.

This blog post follows from a previous one where I experimented and mulled over the functions provided by the content mapping and mashup functionality provided by Dapper. In my first trial run, I created a mashup for an online discussion forum in which I participate on a regular basis. The mashup was pretty simple – yet, it was the result of composing several dapps together in an iterative manner using a variety of information output formats. In this post, I am summarizing how I was able to take the final dapp that was created in part 1, and use it as an input to Microsoft’s Popfly mashup creator.
The data flow schematic and the popfly screenshot below reveal the configuration between the dapp and the popfly mashup. What’s happening here is that the dapp is used to output an RSS feed which is then captured by the RSS block in popfly. The specific items from the RSS feed are then rendered as a table.
Dataflow Schematic - Dapper & Popfly Integration

Popfly Screenshot - Dapper & Popfly Integration

After reading the above, you’d probably wonder if this new configuration is really a “mashup” afterall in it’s strictest definition… and the simple answer to that is “probably not”… since the data in this case is being acquired from a single source, i.e. the dapp. However, the dapp itself was constructed in such a way that it fetches and formats data from multiple sources - so the original dapp itself was a mashup! That being said, the integration between dapper and popfly goes to show two important aspects of mashups: composability and reuse. The original dapp has now been composed with a different output stream, i.e. RSS and it has been configured with a new presentation format, i.e. table display in popfly. The end result is shown below:
- Dapper gathers feeds from the online forum and combines those feeds with last posters avatars into a data object;
- Popfly acquires the new data object and displays the data
Mashup - Dapper & Popfly Integration
*Embedded Content Removed - Popfly website is no longer available*
Wednesday, December 10, 2008
Playing with Mashups - Part I : Using Dapper for Content Mapping
This is the first blog post in what I plan to be a series of posts to share my experiences with various mashup building applications online.
Over the last couple of days, I’ve been playing with the data mapping and mashup functionality provided by Dapper. Overall, my experience has been rather pleasant, and I would definitely suggest the service to someone who’s just getting started with mashups. It should be noted however, that on the outset, Dapper is more of a data mapping service than a mashup. The main features and functions of Dapper allow the end-user to extract pieces of information from websites and label and organize the information in a logical structure. The resulting information structure can then be output in various formats including XML, HTML, and RSS feeds, or it can be rendered in specific applications such as a Google Gadget or a Flash Widget. It’s pretty cool when you try all the available output options for the first time.
So to test out the basic functionality of Dapper, I set out on a simple task to query the Google Scholar search engine and fetch the list of my research publications. I thought this might result in something I would want to use in the future… and I was right. Other than the fact that Google Scholar still does not index many academic repositories and hence, the results are not comprehensive, I did get some results which I was able to formulate into a dapp. The resulting dapp was then rendered as a flash widget (shown below).
Here is a summary of the procedure to get to the results as displayed in the flash widget above.
1. Login to Dapper
2. In the section titled, Get any content from the Web, click on create a new Dapp
3. Enter the Google Scholar URL pointing to the search results you want to extract from.
In my case, I used: http://scholar.google.ca/scholar?q=author:"Umar+Ruhi"&num=100&scoring=r
My name is specified in the author parameter. The num=100 parameter specifies the number of search results to show; and scoring=r specifies that I would like “r”(recent) articles to be listed first.
Under the form address bar, you can leave the format as Dapp XML.The output format can be customized later.
4. Once you see the google search results in Dapper’s virtual browser, you can select “Add to Basket”.
5. Ideally, at this point, it is recommended that you also give Dapper a couple of other similar pages (e.g. search results for other authors), so that Dapper can make some sense of the webpage structures. I didn’t really feel the need to do so in this case. If you want Dapper to just analyze the webpage structure of more pages, you can enter their URLs and “Add to Basket”. Once done, you can click on the Next Step button.
6. With the page(s) in the basket, you can start selecting areas of the page that you would like to save into your information structure for output. For example, I clicked on the titles of the search results which highlighted all the titles on the page. Sometimes, Dapper will select other non-related areas automatically, and you will need to manually de-select these by clicking the Clear link for the item(s) in the Preview selected content pane.
7. If you’re satisfied with the selection of information items, you can click on the Save Field button and provide a label for the field.
8. Steps 6 and 7 can be repeated to gather more information items from the webpage in the basket. With all the content fields identified, you can click on the Next Step button.
9. On the next screen, you will group the content fields and provide group name(s). These group names will be used to structure the resulting dapps. With all the groups specified, click on the Next Step button to proceed to the last screen.
10. On the last screen, you will be asked to save the dapp and provide a description. You will also have the option of making the dapp private, i.e. only you or someone who knows the exact address of the dapp or its output feeds will be able to access it. I use the private option for most of my dapps which I know have little utility for anyone else.
The input variables are meant to provide a mechanism for allowing an end-user to customize how the dapp is called. It is an optional feature, and you can click on the help link to learn more. Click Save when you’re done entering all the details of the dapp.
11. Now that the dapp is created, you will be presented with a variety of output options which you can play around with to see which option works best for you. As shown above, I selected the flash widget to present the results of my dapp.
That’s about it in terms of how the Google Scholar dapp was created. For everyone who’s interested in exploring Dapper, I also hope this mini-tutorial comes in handy for learning about other basic features of Dapper.
Subscribe to:
Posts (Atom)